top of page
Made by: Olek Nowacki
IDEAS & EXPERIMENTATION
Experimentation
IDEAS
In order for me to properly bring my ideas to life, I have to first visualise how exactly those ideas will look like. For this section, I have created a range of different sketches, which will serve my main base of my FMP and as a reminder of what should be included in the trailer.

The first image that is being shown is the first concept that I have created for my FMP. This image contains a drawing of a man inside of a television screen. Although the whole body will not be shown, the man will be wearing a standard fedora and a classic suit, similar to a sui that was mentioned on my secondary research. The reasoning behind the drawing having a "+" on the face of the man is because the face of the man will not be shown and because the trailer itself will not be a "animated trailer", meaning that I cannot create an original face, as someone will be playing as said character.

Although there were people who thought I should go with a "Slender Man movie" font, I had an idea of trying to create my own font which would be similar to the font some of the people I questioned liked. For this, I have wrote the classical "Lost Broadcast" title in Bold text and used it as my base drawing. I then attempted to create a font which was normally seen in the original Slender Man stories and games, with a text being covered with a bunch of sharp spikes. I then attempted to recreate the official Slender Man Movie font that was used and I also attempted to create a more fancy font. From a quick feedback, a lot of people liked the second font that I have made, which means that I could potentially use this font in my trailer. Whilst making the font, I realised that it would work perfectly with the a TV noise background, mostly because I would have to animate the text disfiguring.

This drawing is a concept of what exactly would be in the room that the TV is sitting in. In this drawing, there is a portrait which is meant to represent the black figure and their son whose face has been scribbled out. The drawing also contains a lamp which is meant to be swinging left and right whilst shining on the TV.
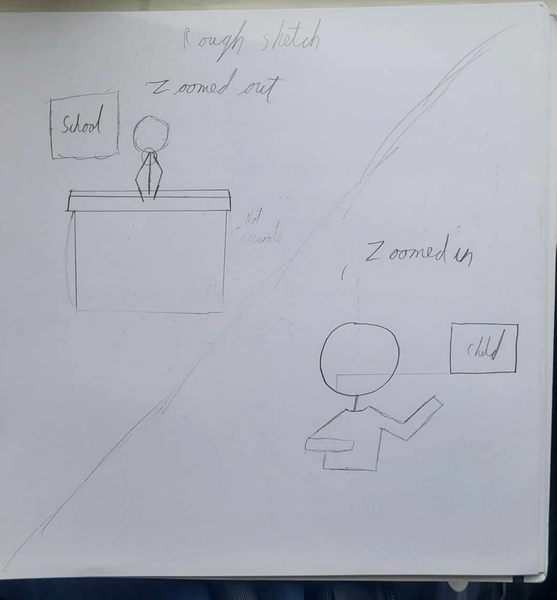
This image represents one of my early and a slightly rushed version of what would be on my story board. This drawing can be considered an alpha version of how some of the scenes would look like in my FMP.

This image contains a short story board of what exactly will be happening in the teaser trailer. The story board consists of 8 different sketches, with the 9th one being an optional last one to make the trailer slightly more creepy. Those sketches also contain a description underneath them, summarising what exactly will be happening in a scene. Furthermore, in the storyboard, in the middle of the first 6 boards, there is a small piece of text which is mentioning how there will be text present in the teaser trailer, the piece of text that is usually on a plain background.

This image shows a naming scheme of what the characters in my teaser trailer will be called. It is important to have the characters named as in the teaser trailer, all three of the featured characters will have their names said at least once. The page has been split into two sides: one for the news reporter and one for the father and son. To indicate who will be called who on the father and son side, at the beginning of each word there will be a letter, either F or S, which will work as a way to indicate what name belongs to who.

This image shows is the updated list of character names, now containing some names for the child if I were to decide to them a female. To come up with some of the female names, I asked my fellow students and received some of the name suggestions from them.
It is also important to note that the last names connected to the first names are not final and may be swapped around in the final product.


The last two images showcase a quick sketch of what the ending image of my teaser trailer would look like. The first image showcases a sketch of how the ending sequence of the teaser trailer would be traditional "We'll Be Right Back." However, unlike the traditional version, this version will have the head of the mysterious figure as the logo.
The second image represents two concepts I had for the 4 wheels which are located at the corners of the sketch. However, I have come to realise that the wheel with the numbers on them is the most appropriate thing to use, as all other "We'll Be Right Back screens" use the same circle.
EXPERIMENTATION
After I have finished my research on ideas that I could implement to my FMP and creating some ideas via sketches, I have decided to now experiment with After Effects and Photoshop to try and see if I can create scenes the way I imagine them to be in my teaser trailer.
Whilst doing my experimentation, I have been looking at tutorials on how to do certain tasks in After Effects and Photoshop, just in case I got stuck or was unable to know where to go from there.
AFTER EFFECTS 3D ENVIRONMENT
TUTORIALS WATCHED
Source: 3D layers and lighting in after effects | part 2: Lights and cameras (2020) YouTube. Available at: https://www.youtube.com/watch?v=XYnSHQTbCm4 (Accessed: 06 April 2024).

Creating a 3D environment in Photoshop
To start off my experimentation, I had to downgrade my photoshop version to version 23.0, as the newer versions of Photoshop no longer allow you to create vanishing points. After changing the version, I have imported an image of a street and entered the vanishing point option and created multiple grids on the image. Once the grids were created, I exported the file as a VPE file.

Importing the VPE file into After Effects

After the photo was exported as a VPE file, I went onto After Effects and created a new composition (another word for composition is a video project), pressed "Files" and then clicked import. Afterwards, I went through my files to locate the VPE file I called "PractiseVPE." Once that was done, I checked to make sure that the image was now a 3D environment.


Creating and connecting a null object to a camera
Now that I had created my 3D environment with adjustable images, I had created a new camera and a null object and connected the camera to the said null object. Connecting the camera to the null object would mean that my camera, no matter how I move it, would continuously focus on that one point.

Giving shadow properties to images
Once my camera was connected to my null object, I have started to give my images shadow properties by going into their material options and turning on "casts shadows." This would mean now that if I were to add a light source to the composition, the images would give out a shadow based on the direction of the light source.

Importing a 3D model to After Effects
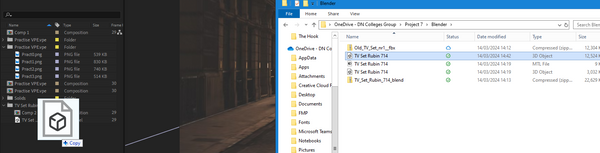
After I made my images being capable of casting shadows, I have downloaded a free TV asset from TurboSquid and made some slight adjustments in blender, as the first time I imported the model, it slightly broke my entire composition. I fixed the issue by first removing everything but the vintage TV asset and then importing it to After Effects. Although the image was imported into After Effects, it still had issues with properly appearing, as for the model to appear in After Effects, the source that it originated from (such as blender) must also be present on the same computer.

Creating a custom shadow

After importing the 3D model into After Effects, I have noticed that the model was lacking casting shadows features, which meant that the object itself could have shadows on it, but was unable to cast any shadows. Because the 3D model did not come up with any shadow casting feature and because it was not compatible with the shadow creation tool, I had to create my own custom shadow in After Effects.
To do this, I have created a solid object and made it a dark grey colour, after doing that, I inserted the "bezier warp" effect to manipulate the way the solid looked like, as I was unable to create a custom shape. After adjusting the shape of my custom shadow, I have gave the shadow 3D properties, so that it would look like it was being cast by the TV screen. At this moment in time, I did not realise that I was attempting to create a reflection TV's screen. This made me realise that I tried to give the part of the TV that was not being affected by the light a custom shadow. However, as I continued, I adjusted the rotation of my shape and then gave it the glow effect. Once the glow effect was set, I started testing out different options to see if I could make my solid closely resemble a shadow. At the end, I managed to create a shadow which does not look great, but it did show some effort being put into it.
Final Shadow Results

Creating a 3D environment and trying to combine different object turned out to be more challenging as I originally thought it would be, as it would take hours to properly match an object with an environment that it was not in
RETRO TV STYLED FOOTAGE
For this part of my experimentation, I tried to recreate the style that old TV videos used to have.
To achieve this effect, I have been following a these two tutorials on how to create both the retro look and to create my very own TV noise.
TUTORIALS WATCHED
Source: TV noise effect | tutorial | after effects (2022) YouTube. Available at: https://www.youtube.com/watch?v=VBhbLY4UMD0 (Accessed: 06 April 2024).
Source: Composite a TV screen in after effects (2023) YouTube. Available at: https://www.youtube.com/watch?v=R0aXUuuFj-g (Accessed: 06 April 2024).
To start off my experimentation, I have first looked around to see if I could find any footage that would work as my base, which turned out to not be a long task since I managed to find a piece of short footage that one of my piers sent me.

Shifting channels
Once I imported the video into After Effects, I added the "shifting channels" effect, duplicated the footage and then restricted each video to one different colour. Afterwards, I have adjusted the position of the each video to try and replicated the colour off set the footage had.

TV Noise
During the early days of television, whenever a signal was being interrupted, the TV would display a constant footage of white, grey and black particles as a replacement for the footage that was meant to currently play
After I have edited the main footage, I started creating my TV noise, which I would use at both the beginning and at the near end of my teaser trailer. I have created 2 different white solids and gave them both the fractal noise effect and changed the uniform scaling for the second layer and changes the height and width of the first layer. I also gave both layers custom speeds to make the static changes occur more naturally rather than slowly.
Results

Although the footage looks identical to regular TV noise, the clip does not last long, meaning that I would have loop the TV static to get the effects that I want. Trying to decrease the speed of the lines that appear on the footage would result in the clip lasting longer, however, it would also result in the clip looking less realistic.

Lowering footage quality
Unlike modern day, whenever some sort of footage or show was being streamed or played on old television, the footage would lose quality, which therefore makes sense for my footage to also have a lower quality. To create this effect, I have created an adjustment layer and gave it a mosaic effect, that way, I was not required to add this effect to every single layer and footage. Once the effect was set, I have increased the amount of horizonal and vertical blocks, which managed to create the effect of the footage looking worse than it would actually look like
Results

CREATING THE SCENE
Now that I have completed the core of my project, I had to now add the footage onto my TV screen and import that into my 3D composition.
For this, I have been continuing to follow the same tutorial that I have used to make my footage look vintage.
TUTORIAL USED

The Pen tool allowed me to create a path which would be used to crop out specific parts of the footage.

To start off this section, I first focused on importing my footage into a composition which has contained a 3D picture of a retro/vintage television. Before properly starting, I have swapped the 3D television model for a 2d image, as that resulted in combining the footage much more easily.
I firstly used the pen tool around the inside of the TV and set its solid colour to green. Once I have turned the mask into a solid colour, I linked the footage matt to the mask and duplicated the footage three times. Afterwards, for the three clips that were duplicated, I have changed all of their modes to "screen and gave them the "Fast Box Blur" effect.
Results

Once my footage was done, I made a composition on it so that I would not create a cluster in my main composition.

After I have finishing combining my footage with the TV, I imported the composition to my main composition and gave it 3D properties, which allowed me to adjust its positions and allowed it to get affected by the spotlights.

Now that my footage is in place, I attempted to add a old ceiling lamp and give it a small swinging motion. For this, I have added a a spotlight and gave it 3D properties, once that was done, I have entered the 4 way camera view to and started to move the spotlight along its XYZ axes. Once the spotlight was above my television, I adjusted its light radius to try and make it look like the light is coming from a old lamp. After my lights quality set, I changed the lights cone to make it look like it is coming from a small light source, which may be adjusted later on in the future. Then, I attempted to give my light source a swinging motion, and I did that by going to the very beginning of the footage, clicked on the stop watch, moved along the time stamp and changed the way the light was facing, that way, I was able to create a swinging motion. To attempt to smooth out the animation I added a easy in and a easy out modifier to each of the time nodes.
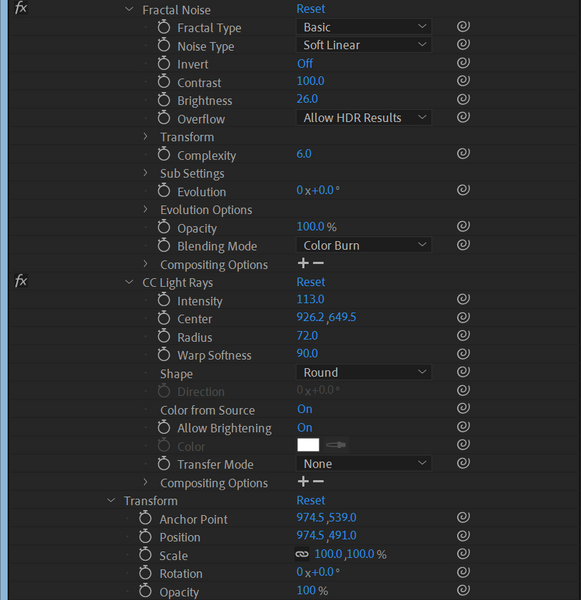
After creating the light swinging motion, I attempted to create a outer TV glow to make the image look slightly more realistic. To do this, I started off by creating a solid white layer and giving it two effects: Fractal Noise and CC Light Rays. Although, after looking at my work, Fractal Noise did not really add anything to my project.

Once I have created my light rays, I have positioned the light source to make it look like it was coming from the edges of the footage, then, I have duplicated the TV composition and moved it to the very top of my composition layers. Afterwards, I have used the pen tool to create a TV mask, which resulted in a effect of the light coming out of the sides of my footage.
Results

Background Source: Nwanya, G. (2016, September 20). architectural photography of vehicle between two buildings. Unsplash. https://unsplash.com/photos/ieL8dmGwBGY
TV Source: Dieckman, A. (2017, October 24). Retro. Pinterest. Retrieved April 23, 2024, from https://www.pinterest.co.uk/pin/738590407611315650/
Even though the light makes the footage looks realistic, at the time I was unable to find a way to change the colour of the lights, furthermore, making the lights feel like they are coming out of the TV screen was proven to be more difficult, because both the screen and the light were two separate objects, with the light being 3D and the screen being 2D. Furthermore, I was unable to make the light appear only around the TV screen.
MATCHING SCENES
Because I am working with a 2D image, I have to somehow ensure that the image matches the image of the environment, as leaving the images as they are would potentially ruin the immersion.
For this experiment, I have followed a simple tutorial on how to match colours.
TUTORIAL WATCHED
Source: How to combine photos in photoshop for beginners (compositing) (2022) YouTube. Available at: https://www.youtube.com/watch?v=5YTSEtjlZx4 (Accessed: 06 April 2024).

To start off this experiment, I had implement the two images that I have used in my "creating a scene" experiment. I first dragged in the larger image to the smaller image, as that would mean I would not have to increase the image size, as increasing the image size of a small image would result in the image becoming more pixelated. I then readjusted the scale of my TV image.

Once both of my images were together in one project, I had to now make it so that my TV had the colours from the background image. To do this, I have selected "Image", then pressed "adjustments" and then I selected "match colour." After doing this, I have used my background image as my source and adjusted the "Fade" slider, to try and make it so that the TV PNG has the same colour texture as the street image.
CUSTOM TEXT
Movies, teasers and trailers always utilise their very own font. A custom text/font is usually created for those things to make the text feel like it is not out of place. So for this section, I have decided to create my very own text style/font for my end title for my teaser trailer.
Unlike the previous sections, I did not follow any previous tutorials.

Using the wrinkle tool would allow me to create spikes on surfaces on wherever my mouse was.
To create my own font/text style, I have went into Illustrator and used the pen tool to create my own text, after completing that, I have used the wrinkle tool and adjusted it's settings. Once the settings were done, I have started to use the tool to make the text look like it was being affected by TV static.
Results

Creating a custom font that would fit with the theme of my teaser trailer felt like it would improve my teaser trailer by a large margin.
BACK TO THE TOP
BACKGROUND MUSIC
In every type of teaser trailer, in the background there is a piece of music which constantly plays throughout the entirety of the teaser trailer. However, in teaser trailers, the music is usually cut near the end or somehow mixed in to make it feel like the music was being played in the teaser trailer's universe. For my teaser trailer, I am planning to slow down the music that I will use and then play the ending during the title reveal.
For this, I have been following this tutorial which explains how exactly to create this effect.
TUTORIAL WATCHED
Source: How To Add TurnTable Slowdown Audio Effect In Premiere Pro CC And Audition (Tutorial) YouTube. Available at: https://www.youtube.com/watch?v=Q2H1jZWS9bY (Accessed: 23 April 2024)
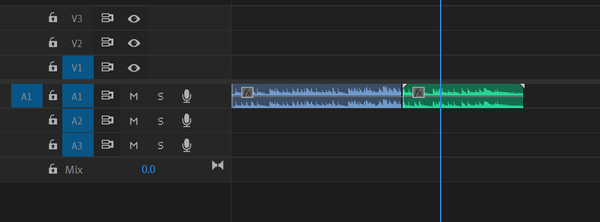
To start off this experiment, I have looked for a music clip to use as a practise and then imported it into Premiere Pro. Once that was done, I snipped the clip into 3 parts and removed the third part to make the effect more realistic.

The Turntable Losing Power effect would slowly result in the audio slowing down and becoming distorted, making it sound like a a music box being unwounded.
Once I had the video clipped, I have imported the second part of the music video into Audition, then, I repeated what was done in the video and chose the "Turntable Losing Power" effect and then saved it so that the changes may take place. Afterwards, I had extended the clip's duration in Premiere Pro so that the effects applied to the clip may take place.
Results
Source: Kilo (OUTRO) (2023) YouTube. Available at: https://www.youtube.com/watch?v=IsqMhKPbIp4&t=1s (Accessed: 22 April 2024)
BACK TO THE TOP
GREEN SCREEN MATTE
Because in my FMP there will be a news studio, I will have to use a green screen to put a background of the news studio behind the actor that will be sitting in the front of the green screen.
TUTORIAL WATCHED
Source: Green Screen Keying with Keylight in After Effects CCYouTube. Available at:https://www.youtube.com/watch?v=2b796PpS9y8 (youtube.com)(Accessed: 23 April 2024)

I have used a background that had a singular colour as having a singular colour would allow me to remove the background, without having to remove every colour variant that is present. Furthermore, removing the background allows me to important any image that I want behind the actor.
I started off the project by using the pen tool and drawing a matte around the person being recorded. I made sure that none of the limbs were cut out as I was creating the map, as the footage would result in some of the limbs being removed when reaching a certain point.


After using the pen tool, I have used the 'keylight' effect and selected the colour that is the closest to the subject. This resulted in most of the green colours being removed from my footage. I have then adjusted both the black and white matte levels, to ensure that my footage was mostly black and white.

Afterwards, I have applied to my composition a 'simple choker' effect which allowed me to control how much of the green screen around my subject is shown. I have the values of the choker to -100 to ensure that all of the remaining remnants of the green screen are shown.


Finally, I have created a composition from my footage and applied the 'keylight + key cleaner + Advanced Spill Suppressor' effect. After applying the effect, I have once again made it so that my footage is completely black and white by controlling the white and black matte. Lastly, all I have done is activate the suppressor to remove any green colours that remained on my footage.
Results
BACK TO THE TOP
bottom of page